
 Home
Home Latest images
 Register
 Log in
Koolance CPU-370 Review
3 posters
https://mcstylists-overclock.forumotion.com :: Computer & Technology Reviews & Contests :: Core Component & Misc Reviews :: System Cooling
Page 1 of 1

Koolance CPU-370 Review
![]() by 4hams Tue Apr 19, 2011 9:32 am
by 4hams Tue Apr 19, 2011 9:32 am
Koolance CPU-370 Review
Monday, 18 April 2011 19:42Written by Eric (Vapor) Hassett

Intro
This is a big day for us, not only do we have a great block to review but we’re also debuting the 2011 CPU Block Comparison. On the Testing Specification page we’ll talk about the updates for the testbed and the how/what/why in the procedure but for now, let’s just talk about the Koolance CPU-370. We already previewed the CPU-370, looked at the changes it made from the CPU-360 and where its performance improved and where it could get better. Since then, Koolance has come out with a 1.5mm injection plate to replace the 2.0mm plate. The review will be less about what has changed and more about what it is.
The Koolance CPU-370 is a great block; it performs great, it has an easy to use and robust mounting system, has out-of-the-box compatibility with all major sockets, and gets a lot of the little things right. What do I mean by little things? The ability to change mounting plates without completely disassembling the block; the ability to easily disassemble and reassemble the block (no awkward balancing acts required); the use of Torx screws instead of easy-to-strip hex (block includes a Torx allen key); G1/4 port spacing wide enough to fit basically any set of fittings you want; and full plating to deter block corrosion.

Is it a perfect block? No, there’s no such thing. The mounting system isn’t quite as easy to use as Swiftech’s, although it is significantly more robust. It basically looks the same as a CPU-360, something some people might not like for a new block. My hunch is that if the internals were rotated 90 degrees and the bow were in the same direction, performance would be even better. It’s expensive at just under $85 MSRP. The included thermal paste isn’t a top-notch performer. How major of issues are those? Depends on the individual, I suppose. Other than price, it doesn’t seem reasonable that any of them could be deal breakers on their own (i.e., without considering how they compare to other blocks, especially in performance).
So the big question now is, how does it perform? In this review we’ll be testing performance with Arctic Cooling MX-2, performance with AquaTuning Silver Grease, performance with Indigo Xtreme, performance with stock TIM, and flow rate vs. temperature performance. With all of that data, we’ll be able to know the quality of contact it makes, its out-of-the-box performance, how much mounting variation there is, and how flow dependent it is. This will be done for every block we test on this testbed, so it will get really interesting over time to see how every block compares in terms of things beyond just raw temperatures and flowrates.
The Block


Here you can see the face of the CPU-370–the text is now justified so that it’s readable when mounted and the G1/4 ports have been shifted ‘down’ so that the silhouette is now symmetrical. This also means the inlet is no longer in the center of the ‘throwing star’ shape.


Here we can see a peek into the block and how the microchannels are now visible from the outside (they were not with the CPU-360). You can also see the reflection of the box on the bowed base–a lot of deformation means there’s a pretty significant bow. When these pictures were taken the base had already been subjected to over 40 mounts–you can kind of see the wear on the base, but there isn’t much at all.

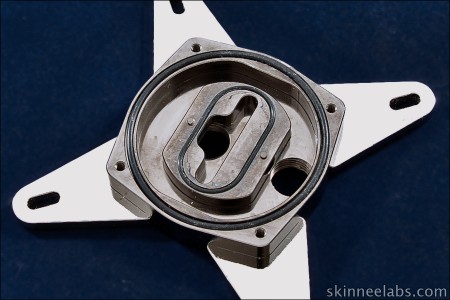
Here you can see how the inlet and injection plate work together. The injection plate is smartly held in place by two protrusions preventing it from twisting or dislodging.


Here you can see the microchannels up close. You can also see some wear from the major o-ring, the flow, and the injection plate.
The Mounting System
Koolance’s mounting system is easy to use, extremely robust (the mounting system in use during these tests and the Preview’s tests has been used in over 150 mounts total and has no signs of weakening or wear), and fundamentally the same for all sockets. Here’s a walkthrough installation on an LGA1366.


All the parts needed, note that a CPU-360 is substituted for a CPU-370 in these pictures (mounting system and steps are identical). First four steps are to tighten all the posts to the backplate, a small set of pliers can be used here to help tighten the posts.


Step five is to slide the silicone insulation pad over the posts. Step six is to slide the backplate and post assembly through the motherboard’s socket mounting holes.


Step seven is to place block onto the posts. Steps eight through eleven are to evenly tighten down the thumbnuts and then you’re done. Between step seven and step eight, there’s four optional steps of using the included clear washers between the block and the spring/thumbnut assemblies–these are aesthetic steps to prevent wear on the top of the mounting plate.
The mounting system has a few great points. First, the backplate/post assembly does not have to be installed or attached to the motherboard. If you have a cutout behind your CPU socket, this means you don’t need to remove your board to easily install this block–you can assemble the backplate at your desk and then just use it. If you don’t have a cutout, your interaction with board is still minimal. Second, the thumbnuts and posts tighten extremely smoothly, are extremely strong, and are easy on your fingers. Overall it’s just really easy to use, it’s really, really strong, and can be used to the fullest on any modern socket.
The mounting system is not perfect, however. Assembling the backplate assembly is four steps more than what Swiftech requires; you can’t use any tools to help tighten the block (I wouldn’t use pliers on the thumbnuts, and you can’t use a standard wrench, screwdriver, nut driver, or really anything without worry of damaging the thumbnut); and there’s little indication of when you have the ‘right’ mounting pressure. There’s two guidelines for mounting pressure: 1) top of the thumbnut flush with the top of the threaded post and 2) tightened until you can’t tighten any more. I try to land between the two guidelines, using my thumb to graze over the top of the thumbnuts to feel how far out the posts protrude to ensure even pressure (it’s only ~2mm of protrusion, which is easy to feel and which can also be easy to eyeball at the right angles). For 2011 CPU Block Comparison, calipers will not be used for mounting–having a mounting system that Goldilocks the mounting pressure on its own is the goal.
Testing Methodology/Specification
If you are regular Skinnee Labs readers then you already know we do things a little differently. For those of you who found your way here for the first time, brace yourself, because we go all out on our test methodology and specification. We are not here for publishing fluff pieces; we want the hard data on every product we test even if that means more work. After all, we want to know how well each product performs and where to spend our money as well… we are enthusiasts just like you are. With the proper forewarning given, strap yourself in as we dive into the test method and specification.
Pressure Drop/Restriction
When planning your loop there should be a list of things that come to mind, flow and pressure should be near the top of that list. Pressure drop is the measurement of inlet pressure minus outlet pressure, or the pressure loss of flow through the component.
Test Method/Spec
I have a flowmeter and manometer permanently installed in my CPU Block Testbed. There is no way for me to vary flow in my loop other than by changing pumping power. The flowmeter is mid-loop but the manometer spans the CPU block. The bottom port on the flowmeter is the inlet and top port is the outlet. I use Bitspower cube fittings (which also house the block inlet/outlet temperature sensors). At the block, I use use Bitspower 1/2″ fittings with a Bitspower rotary at the inlet and a Koolance rotary at the outlet. For the pressure lines I use Feser 3/8-1/2″ tubing connected to Koolance 3/8-1/2″ compression fittings with Koolance G1/4 to G1/8 adapters at the manometer. Numbers shown are the pressure drop numbers of just the block, the fittings and tubing pressure drop has been subtracted.
•Pressure: Dwyer Series 490-1 Digital Hydronic Manometer. Accuracy 0.5% of Scale, repeatability 0.5%, Range 0-15 PSI, Resolution 0.01 PSI.
•Flow Rate: King Instruments 7510 .3-3.5GPM, 10″ Scale – Accuracy 2% of scale, repeatability 0.5%. Flowrate dictated by pumping power and block restriction.
•Water: Distilled with PTnuke.
Thermal
Methodology
Each block is tested in five series of tests. The first test is seven mounts with Arctic Cooling MX-2, this is the main baseline testing. The second test is seven mounts with AquaTuning Silver Grease, this helps determine the quality of contact. The third test is a mount using Indigo Xtreme and running nine different pump settings, this helps determine maximum performance (best mount), temperature vs. flow rate, pressure drop, and quality of contact. The fourth test is a second Indigo Xtreme mount testing and finalizing all the same aspects of performance. The fifth test is seven mounts with the stock/included thermal compound, this helps determine out-of-the-box performance. For MX-2, ATSG, and Stock TIM testing, the worst two of the seven mounts gets excluded from the average. This is done so the final result is more representative of what to expect when you get a good mount.
Each mount and pump setting run is a 2 hour and 35 minute test with OCCT 3.1.0 with the first minute at idle, the first thirty minutes of load discarded (as the block reaches equilibrium with the water temperature and as water temperature steadies), 2 hours of load are used in every data point, then the last four minutes are idle. I use OCCT’s Small Data Set algorithm at normal priority and I use OCCT’s internal logging (I’ve found no other application can reliably avoid stalls and log a data point every second).
Each run I log flowrate and pressure drop. Between each mount I do a basic cleaning of the IHS using Xtreme Clean and a lint free wipe. Every TIM switch I do a complete clean with Xtreme Clean and also Q-Tips around the edges of the IHS. The CPU is never removed from the socket; the socket latch is never opened.
Calipers will not be used with any mounting system, even if recommended by the manufacturer–we believe calipers are a tool that should not be required when mounting a CPU block. With all mounting systems, mounting will be done by feel; a good mounting system should separate itself from a bad mounting system. In the (hopefully) rare case of a broken mounting system, a backup will be used. If no backup is available or if the backup also fails, a mounting system will be concocted using the various spare parts available and will attempt to mimic the core functionality of the stock mounting system.
Airflow is provided over the RAM, VRMs, IOH sink, and over the GPU. Testbed failure is the biggest concern we have for testing longevity–so far each CPU Block Testbed has failed and ushered in the next set of testing (rather than completing a set of testing to the full degree we would like to do)–keeping the motherboard and secondary components cool is one way we’ll help mitigate component failure. When a single component fails, the entire testbed is considered dead and the test roundup is finished.
Specification
The watercooling loop I use is fairly abnormal, but allows me to test the way I want to test. The biggest abnormality is that the radiators and CPU block are not in the same “subloop.” The radiators are in a loop with the reservoir and their own pump; the CPU block is in a loop with the reservoir and four DDC pumps. This allows me to isolate the flowrate through the CPU block from the flowrate through the radiators. Not all radiators have the same performance response to flowrate (and thus, , so it’s better to just completely remove them from the varying flow.
24 Dallas One-Wire temperature sensors are used throughout the loop and on the radiators. Twelve are used on the radiators. Six are used in the water in the radiator subloop (two at the radiators’ inlet, four at the radiators’ outlet) and sixe are used in the water in the CPU block subloop (four at the block’s inlet, two at the block’s outlet). All but the six temperature probes in the CPU block loop play a secondary role in the results. I have found that basing results on Air Temperature instead of Water Temperature to be extremely unreliable–maintaining consistent dust levels on the radiators and maintaining temperature gradients across the radiators are basically impossible in the long term.
Water temperature is measured as the average of the block inlet and outlet temperature values (four inlet probes are averaged to a single inlet value, two outlet probes are averaged to a single outlet value). Due to the fact that flowrate is not held constant across blocks (and especially not during flowrate vs. temperature testing), this is the best way to gauge the temperature in the block. Exclusively using block inlet or block outlet temperatures artificially favors low-restriction and high-restriction blocks, respectively (as well as skewing flowrate vs. temperature testing).
All the Dallas One-Wire temperature probes are calibrated against each other so that if they’re in the same place at the same time, they’ll all read the same thing. From there, we’ve calibrated and linearized the raw readouts from the CPU thermal sensors to the Dallas One-Wire probes. This means that for every 1C increase in water temperature, the CPU now responds with a 1C increase in CPU temperature. We’ve found that Intel CPUs, depending on their voltage, have different thermal sensor behavior and this can dramatically skew results if uncorrected.
Below is list of all of the tools, gadgets, goop along with all the hardware used for testing:
•Hardware Platform: ◦Motherboard: MSI X58 Big Bang
◦CPU: Intel Core i7 930 D0 ■3800MHz (19×200) @ 1.52V Vcore)
◦RAM: Kingston Hyper-X DDR3 at 1600MHz, 8-8-8-24 - Dual Channel @ 1.55V (BIOS Set)
◦GPU: AMD HD4350 low-profile
◦System PSU: Antec CP-850 850W
◦Pump PSU: Zippy 700W
◦HDD: Western Digital Caviar Blue 320GB 7.2k RPM 8MB Cache
•Case: HSPC Large Top Deck Tech Station
•Cooling Loop: ◦Radiator – Two Swiftech MCR320-QP-K
◦Fans – Twelve Yate Loon D12SH-12 at 5V
◦Radiator Subloop Pump – Koolance PMP-300
◦CPU Block Subloop Pumps – DDC3.25 with Koolance RP-400 top, two DDC3.2 with EK V2 tops, Swiftech MCP35X with stock top
◦Reservoir – Koolance 60mm tube reservoir with various couplings
◦Flow Meter – King Instrument Co. 7510 .3-3.5GPM
•Thermal Interface Materials: Arctic Cooling MX-2, AquaTuning Silver Grease, and Indigo Xtreme
•Temperature Monitoring and Logging: CrystalFontz CFA-635 with SCAB attachment – Used to log 24 temperature sensors at 1 second intervals for the full 155minute duration using WinTest.
•Thermal Sensors: Dallas DS18B20 Digital one-wire sensors – .5C absolute accuracy overall with a .2C mean error between 20-30C.
•Test Bench Sensors Deployed:
◦12 Radiator Air In sensors
◦2 Radiator Water In sensors
◦4 Radiator Water Out sensors
◦4 CPU Block Water In sensors
◦2 CPU Block Water Out sensors
•Data Logging: Each temperature sensor and pump RPM channel is logged for 150 minutes at full load, 30 minute warm-up and 120 minutes of compiled data. OCCT and Wintest are running for the entire test duration, with Wintest and OCCT logging each sensor/data point every 1 second for the entire 150 minute run.
To read the full review please visit our friends @ SkinneeLabs
Monday, 18 April 2011 19:42Written by Eric (Vapor) Hassett
Intro
This is a big day for us, not only do we have a great block to review but we’re also debuting the 2011 CPU Block Comparison. On the Testing Specification page we’ll talk about the updates for the testbed and the how/what/why in the procedure but for now, let’s just talk about the Koolance CPU-370. We already previewed the CPU-370, looked at the changes it made from the CPU-360 and where its performance improved and where it could get better. Since then, Koolance has come out with a 1.5mm injection plate to replace the 2.0mm plate. The review will be less about what has changed and more about what it is.
The Koolance CPU-370 is a great block; it performs great, it has an easy to use and robust mounting system, has out-of-the-box compatibility with all major sockets, and gets a lot of the little things right. What do I mean by little things? The ability to change mounting plates without completely disassembling the block; the ability to easily disassemble and reassemble the block (no awkward balancing acts required); the use of Torx screws instead of easy-to-strip hex (block includes a Torx allen key); G1/4 port spacing wide enough to fit basically any set of fittings you want; and full plating to deter block corrosion.
Is it a perfect block? No, there’s no such thing. The mounting system isn’t quite as easy to use as Swiftech’s, although it is significantly more robust. It basically looks the same as a CPU-360, something some people might not like for a new block. My hunch is that if the internals were rotated 90 degrees and the bow were in the same direction, performance would be even better. It’s expensive at just under $85 MSRP. The included thermal paste isn’t a top-notch performer. How major of issues are those? Depends on the individual, I suppose. Other than price, it doesn’t seem reasonable that any of them could be deal breakers on their own (i.e., without considering how they compare to other blocks, especially in performance).
So the big question now is, how does it perform? In this review we’ll be testing performance with Arctic Cooling MX-2, performance with AquaTuning Silver Grease, performance with Indigo Xtreme, performance with stock TIM, and flow rate vs. temperature performance. With all of that data, we’ll be able to know the quality of contact it makes, its out-of-the-box performance, how much mounting variation there is, and how flow dependent it is. This will be done for every block we test on this testbed, so it will get really interesting over time to see how every block compares in terms of things beyond just raw temperatures and flowrates.
The Block
Here you can see the face of the CPU-370–the text is now justified so that it’s readable when mounted and the G1/4 ports have been shifted ‘down’ so that the silhouette is now symmetrical. This also means the inlet is no longer in the center of the ‘throwing star’ shape.
Here we can see a peek into the block and how the microchannels are now visible from the outside (they were not with the CPU-360). You can also see the reflection of the box on the bowed base–a lot of deformation means there’s a pretty significant bow. When these pictures were taken the base had already been subjected to over 40 mounts–you can kind of see the wear on the base, but there isn’t much at all.
Here you can see how the inlet and injection plate work together. The injection plate is smartly held in place by two protrusions preventing it from twisting or dislodging.
Here you can see the microchannels up close. You can also see some wear from the major o-ring, the flow, and the injection plate.
The Mounting System
Koolance’s mounting system is easy to use, extremely robust (the mounting system in use during these tests and the Preview’s tests has been used in over 150 mounts total and has no signs of weakening or wear), and fundamentally the same for all sockets. Here’s a walkthrough installation on an LGA1366.
All the parts needed, note that a CPU-360 is substituted for a CPU-370 in these pictures (mounting system and steps are identical). First four steps are to tighten all the posts to the backplate, a small set of pliers can be used here to help tighten the posts.
Step five is to slide the silicone insulation pad over the posts. Step six is to slide the backplate and post assembly through the motherboard’s socket mounting holes.
Step seven is to place block onto the posts. Steps eight through eleven are to evenly tighten down the thumbnuts and then you’re done. Between step seven and step eight, there’s four optional steps of using the included clear washers between the block and the spring/thumbnut assemblies–these are aesthetic steps to prevent wear on the top of the mounting plate.
The mounting system has a few great points. First, the backplate/post assembly does not have to be installed or attached to the motherboard. If you have a cutout behind your CPU socket, this means you don’t need to remove your board to easily install this block–you can assemble the backplate at your desk and then just use it. If you don’t have a cutout, your interaction with board is still minimal. Second, the thumbnuts and posts tighten extremely smoothly, are extremely strong, and are easy on your fingers. Overall it’s just really easy to use, it’s really, really strong, and can be used to the fullest on any modern socket.
The mounting system is not perfect, however. Assembling the backplate assembly is four steps more than what Swiftech requires; you can’t use any tools to help tighten the block (I wouldn’t use pliers on the thumbnuts, and you can’t use a standard wrench, screwdriver, nut driver, or really anything without worry of damaging the thumbnut); and there’s little indication of when you have the ‘right’ mounting pressure. There’s two guidelines for mounting pressure: 1) top of the thumbnut flush with the top of the threaded post and 2) tightened until you can’t tighten any more. I try to land between the two guidelines, using my thumb to graze over the top of the thumbnuts to feel how far out the posts protrude to ensure even pressure (it’s only ~2mm of protrusion, which is easy to feel and which can also be easy to eyeball at the right angles). For 2011 CPU Block Comparison, calipers will not be used for mounting–having a mounting system that Goldilocks the mounting pressure on its own is the goal.
Testing Methodology/Specification
If you are regular Skinnee Labs readers then you already know we do things a little differently. For those of you who found your way here for the first time, brace yourself, because we go all out on our test methodology and specification. We are not here for publishing fluff pieces; we want the hard data on every product we test even if that means more work. After all, we want to know how well each product performs and where to spend our money as well… we are enthusiasts just like you are. With the proper forewarning given, strap yourself in as we dive into the test method and specification.
Pressure Drop/Restriction
When planning your loop there should be a list of things that come to mind, flow and pressure should be near the top of that list. Pressure drop is the measurement of inlet pressure minus outlet pressure, or the pressure loss of flow through the component.
Test Method/Spec
I have a flowmeter and manometer permanently installed in my CPU Block Testbed. There is no way for me to vary flow in my loop other than by changing pumping power. The flowmeter is mid-loop but the manometer spans the CPU block. The bottom port on the flowmeter is the inlet and top port is the outlet. I use Bitspower cube fittings (which also house the block inlet/outlet temperature sensors). At the block, I use use Bitspower 1/2″ fittings with a Bitspower rotary at the inlet and a Koolance rotary at the outlet. For the pressure lines I use Feser 3/8-1/2″ tubing connected to Koolance 3/8-1/2″ compression fittings with Koolance G1/4 to G1/8 adapters at the manometer. Numbers shown are the pressure drop numbers of just the block, the fittings and tubing pressure drop has been subtracted.
•Pressure: Dwyer Series 490-1 Digital Hydronic Manometer. Accuracy 0.5% of Scale, repeatability 0.5%, Range 0-15 PSI, Resolution 0.01 PSI.
•Flow Rate: King Instruments 7510 .3-3.5GPM, 10″ Scale – Accuracy 2% of scale, repeatability 0.5%. Flowrate dictated by pumping power and block restriction.
•Water: Distilled with PTnuke.
Thermal
Methodology
Each block is tested in five series of tests. The first test is seven mounts with Arctic Cooling MX-2, this is the main baseline testing. The second test is seven mounts with AquaTuning Silver Grease, this helps determine the quality of contact. The third test is a mount using Indigo Xtreme and running nine different pump settings, this helps determine maximum performance (best mount), temperature vs. flow rate, pressure drop, and quality of contact. The fourth test is a second Indigo Xtreme mount testing and finalizing all the same aspects of performance. The fifth test is seven mounts with the stock/included thermal compound, this helps determine out-of-the-box performance. For MX-2, ATSG, and Stock TIM testing, the worst two of the seven mounts gets excluded from the average. This is done so the final result is more representative of what to expect when you get a good mount.
Each mount and pump setting run is a 2 hour and 35 minute test with OCCT 3.1.0 with the first minute at idle, the first thirty minutes of load discarded (as the block reaches equilibrium with the water temperature and as water temperature steadies), 2 hours of load are used in every data point, then the last four minutes are idle. I use OCCT’s Small Data Set algorithm at normal priority and I use OCCT’s internal logging (I’ve found no other application can reliably avoid stalls and log a data point every second).
Each run I log flowrate and pressure drop. Between each mount I do a basic cleaning of the IHS using Xtreme Clean and a lint free wipe. Every TIM switch I do a complete clean with Xtreme Clean and also Q-Tips around the edges of the IHS. The CPU is never removed from the socket; the socket latch is never opened.
Calipers will not be used with any mounting system, even if recommended by the manufacturer–we believe calipers are a tool that should not be required when mounting a CPU block. With all mounting systems, mounting will be done by feel; a good mounting system should separate itself from a bad mounting system. In the (hopefully) rare case of a broken mounting system, a backup will be used. If no backup is available or if the backup also fails, a mounting system will be concocted using the various spare parts available and will attempt to mimic the core functionality of the stock mounting system.
Airflow is provided over the RAM, VRMs, IOH sink, and over the GPU. Testbed failure is the biggest concern we have for testing longevity–so far each CPU Block Testbed has failed and ushered in the next set of testing (rather than completing a set of testing to the full degree we would like to do)–keeping the motherboard and secondary components cool is one way we’ll help mitigate component failure. When a single component fails, the entire testbed is considered dead and the test roundup is finished.
Specification
The watercooling loop I use is fairly abnormal, but allows me to test the way I want to test. The biggest abnormality is that the radiators and CPU block are not in the same “subloop.” The radiators are in a loop with the reservoir and their own pump; the CPU block is in a loop with the reservoir and four DDC pumps. This allows me to isolate the flowrate through the CPU block from the flowrate through the radiators. Not all radiators have the same performance response to flowrate (and thus, , so it’s better to just completely remove them from the varying flow.
24 Dallas One-Wire temperature sensors are used throughout the loop and on the radiators. Twelve are used on the radiators. Six are used in the water in the radiator subloop (two at the radiators’ inlet, four at the radiators’ outlet) and sixe are used in the water in the CPU block subloop (four at the block’s inlet, two at the block’s outlet). All but the six temperature probes in the CPU block loop play a secondary role in the results. I have found that basing results on Air Temperature instead of Water Temperature to be extremely unreliable–maintaining consistent dust levels on the radiators and maintaining temperature gradients across the radiators are basically impossible in the long term.
Water temperature is measured as the average of the block inlet and outlet temperature values (four inlet probes are averaged to a single inlet value, two outlet probes are averaged to a single outlet value). Due to the fact that flowrate is not held constant across blocks (and especially not during flowrate vs. temperature testing), this is the best way to gauge the temperature in the block. Exclusively using block inlet or block outlet temperatures artificially favors low-restriction and high-restriction blocks, respectively (as well as skewing flowrate vs. temperature testing).
All the Dallas One-Wire temperature probes are calibrated against each other so that if they’re in the same place at the same time, they’ll all read the same thing. From there, we’ve calibrated and linearized the raw readouts from the CPU thermal sensors to the Dallas One-Wire probes. This means that for every 1C increase in water temperature, the CPU now responds with a 1C increase in CPU temperature. We’ve found that Intel CPUs, depending on their voltage, have different thermal sensor behavior and this can dramatically skew results if uncorrected.
Below is list of all of the tools, gadgets, goop along with all the hardware used for testing:
•Hardware Platform: ◦Motherboard: MSI X58 Big Bang
◦CPU: Intel Core i7 930 D0 ■3800MHz (19×200) @ 1.52V Vcore)
◦RAM: Kingston Hyper-X DDR3 at 1600MHz, 8-8-8-24 - Dual Channel @ 1.55V (BIOS Set)
◦GPU: AMD HD4350 low-profile
◦System PSU: Antec CP-850 850W
◦Pump PSU: Zippy 700W
◦HDD: Western Digital Caviar Blue 320GB 7.2k RPM 8MB Cache
•Case: HSPC Large Top Deck Tech Station
•Cooling Loop: ◦Radiator – Two Swiftech MCR320-QP-K
◦Fans – Twelve Yate Loon D12SH-12 at 5V
◦Radiator Subloop Pump – Koolance PMP-300
◦CPU Block Subloop Pumps – DDC3.25 with Koolance RP-400 top, two DDC3.2 with EK V2 tops, Swiftech MCP35X with stock top
◦Reservoir – Koolance 60mm tube reservoir with various couplings
◦Flow Meter – King Instrument Co. 7510 .3-3.5GPM
•Thermal Interface Materials: Arctic Cooling MX-2, AquaTuning Silver Grease, and Indigo Xtreme
•Temperature Monitoring and Logging: CrystalFontz CFA-635 with SCAB attachment – Used to log 24 temperature sensors at 1 second intervals for the full 155minute duration using WinTest.
•Thermal Sensors: Dallas DS18B20 Digital one-wire sensors – .5C absolute accuracy overall with a .2C mean error between 20-30C.
•Test Bench Sensors Deployed:
◦12 Radiator Air In sensors
◦2 Radiator Water In sensors
◦4 Radiator Water Out sensors
◦4 CPU Block Water In sensors
◦2 CPU Block Water Out sensors
•Data Logging: Each temperature sensor and pump RPM channel is logged for 150 minutes at full load, 30 minute warm-up and 120 minutes of compiled data. OCCT and Wintest are running for the entire test duration, with Wintest and OCCT logging each sensor/data point every 1 second for the entire 150 minute run.
To read the full review please visit our friends @ SkinneeLabs

4hams- Old Father Time

- Posts : 2708
Join date : 2010-02-06
Location : Ontario, Canada
Re: Koolance CPU-370 Review
![]() by SavageNFS Tue Apr 19, 2011 10:02 am
by SavageNFS Tue Apr 19, 2011 10:02 am
I have that block on my rig. It works flawlessly. Finish on the block is superb (more like perfect) where it contacts the CPU. Exterior finish where the block is seen by eyes is kind of pitted and not perfect at all. It is acceptable, but could be a lot nicer. I'd buy it again...
SavageNFS- Moderators

- Posts : 684
Join date : 2011-02-16
Age : 53
Location : Wisconsin -


bob2701- Respected Forum Idividuals

- Posts : 1474
Join date : 2010-03-04
Age : 83
Location : Jersey Shore
» The Intel SSD 510 Review
» Intel i7 930 2.8ghz review
» External DVD Burners Review
» Internet Explorer 9 Review
» Corsair HS1 Headset Review
» Intel i7 930 2.8ghz review
» External DVD Burners Review
» Internet Explorer 9 Review
» Corsair HS1 Headset Review
https://mcstylists-overclock.forumotion.com :: Computer & Technology Reviews & Contests :: Core Component & Misc Reviews :: System Cooling
Page 1 of 1
Permissions in this forum:
You cannot reply to topics in this forum|
|
|